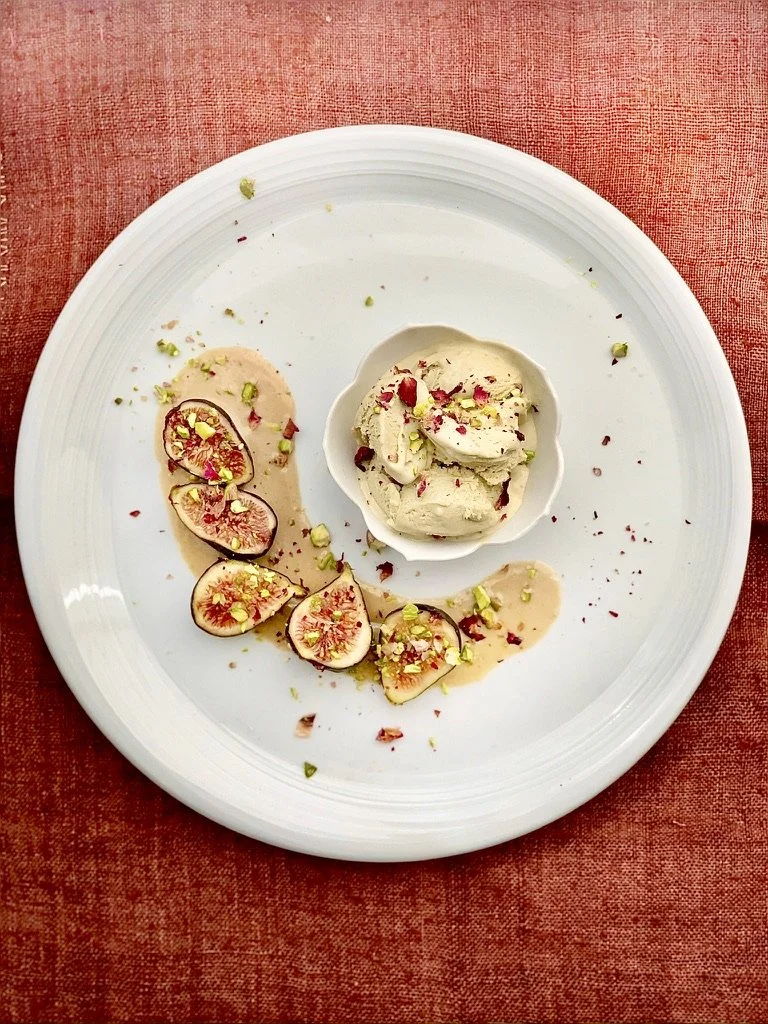
No-Churn Pistachio Coconut Ice Cream with Fresh Figs & Tahini-Maple Dressing
The Joy of Homemade Ice Cream
No-churn ice cream turns the freezer into a small creative studio. There is no machine, no complicated technique, and no pressure for perfection — just blending, folding, tasting, freezing, and sharing. The reward is deeply personal: a flavor that reflects the season, the table, and the mood of the moment.
Yield: 6–8 servings
Active time: 20 minutes
Freeze time: 6 hours or overnight
Dietary profile: lactose-free, dairy-free, vegetarian; vegan if using maple syrup only
Ingredients
Pistachio Coconut Ice Cream
1 cup shelled pistachios, roasted and unsalted
1 can full-fat coconut cream, chilled overnight
1 can sweetened condensed coconut milk
¼ cup maple syrup, plus more to taste
1 teaspoon vanilla extract
¼ teaspoon almond extract, optional but enhances pistachio flavor
¼ teaspoon fine sea salt
1 tablespoon vodka, optional, for a softer scoop
1–2 tablespoons warm water or coconut milk, only if needed for blending
Tahini-Maple Figs
8–10 fresh figs, halved or quartered
3 tablespoons tahini
2 tablespoons maple syrup
1 tablespoon lemon juice or orange juice
1–2 tablespoons warm water, to loosen
Pinch of sea salt
Optional: pinch of cardamom or a few drops of rose water
Finish
Chopped pistachios
Dried rose petals, optional
Flaky salt
Extra maple-tahini drizzle
Method
Make the pistachio paste.
Soak the pistachios in hot water for 20–30 minutes, then drain. Blend with the maple syrup, vanilla, almond extract, salt, and 1–2 tablespoons coconut milk or warm water until thick and smooth.Build the ice cream base.
Scoop the thick coconut cream from the chilled can into a bowl. Whip for 1–2 minutes until slightly aerated. Fold in the sweetened condensed coconut milk and pistachio paste. Add vodka if using.Freeze.
Pour into a parchment-lined loaf pan or freezer-safe container. Cover tightly. Freeze for at least 6 hours. For a creamier texture, stir the mixture once after 90 minutes and again after 3 hours.Make the tahini-maple dressing.
Whisk tahini, maple syrup, citrus juice, warm water, and salt until glossy and pourable. Add cardamom or rose water if using.Plate.
Let the ice cream sit at room temperature for 8–10 minutes before scooping. Serve with fresh figs, tahini-maple dressing, chopped pistachios, rose petals, and a tiny pinch of flaky salt.
Home-cook adaptations
For the easiest version, use store-bought pistachio butter instead of blending pistachios. For a lighter flavor, replace half the coconut cream with unsweetened oat or soy creamer. For a more intense pistachio profile, add ½ teaspoon matcha or a tiny pinch of spirulina for color, but keep it subtle so it still reads as elegant and natural.
For a more scoop-shop texture, add ¼ teaspoon xanthan gum while blending the base. It helps reduce iciness, especially in dairy-free frozen desserts.
Nutritional therapy elements for lactose intolerance
This recipe is naturally lactose-free because it avoids milk, cream, and traditional condensed milk. For people with lactose intolerance, diet quality matters beyond simply removing lactose: calcium and vitamin D are key nutrients to monitor when dairy intake is reduced, according to NIDDK guidance on lactose intolerance nutrition.
Coconut-based ice creams are rich and satisfying, but they are not automatically nutritionally equivalent to dairy. The FDA notes that plant-based milks vary widely in protein, calcium, and vitamin D; fortified soy beverages are the plant-based option considered most nutritionally similar to dairy in federal dietary guidance.
Therapeutic highlights in this dessert:
Lactose-free pleasure: creamy texture without dairy discomfort for many lactose-intolerant eaters.
Mineral support: Tahini and pistachios contribute minerals, while a broader lactose-free diet should still include reliable calcium and vitamin D sources.
Fiber and phytonutrients: figs add fiber, natural sweetness, and polyphenol-rich color.
Satiety: pistachios, tahini, and coconut fat make a small portion feel satisfying.
Digestive individuality: lactose tolerance varies from person to person, and lactose intolerance is distinct from a milk allergy; anyone with a dairy allergy should avoid all dairy proteins, not just lactose.
We love ice cream, and lactose-intolerant individuals can enjoy a creamy, frozen delight with these wholesome ingredients. Make it simple, easy and fun!
Read more about Food Intolerance in comparison to Food Allergies
Here's a recipe for a basic no-churn coconut ice cream using agar as a vegan alternative to gelatin:
Ingredients:
2 cans (13.5 oz each) full-fat coconut milk
1/2 cup sweetener of your choice (such as maple syrup, agave nectar, or coconut sugar)
1 teaspoon vanilla extract
1 teaspoon agar powder
2 tablespoons water
Instructions:
In a small bowl, combine the agar agar powder and water. Let it sit for 5 minutes to soften the agar.
Heat one can of coconut milk over medium heat in a saucepan until it simmers. Reduce the heat to low.
Add the agar mixture to the saucepan with the simmering coconut milk. Stir well until the agar is fully dissolved.
Add the sweetener and vanilla extract to the saucepan and stir until well combined.
Remove the saucepan from the heat and let the mixture cool for a few minutes.
Whisk the second can of coconut milk in a separate bowl until it becomes smooth and creamy.
Slowly pour the warm coconut milk mixture into the bowl with the whisked coconut milk, whisking constantly to combine the two.
Once the mixture is well combined, pour it into a lidded container or a loaf pan.
Cover the container tightly with plastic wrap or the lid and place it in the freezer.
Allow the ice cream to freeze for at least 6 hours or overnight until it reaches a firm consistency.
Once fully frozen, your vegan coconut ice cream with agar is ready to be enjoyed! Serve it in bowls or cones, and feel free to add any desired toppings or mix-ins.
Agar is a plant-based gelatin substitute derived from seaweed and provides a good alternative for vegan recipes. It helps to avoid any ice crystals in your homemade ice cream.
This basic recipe serves as a great starting point, and you can experiment with different flavors by adding ingredients like chocolate chips, fruit puree, crushed cookies, or nuts. Enjoy your homemade ice cream!
Here's an adjusted version of the recipe that incorporates egg yolks and organic gelatin for a creamier texture with diary cream version. If you can get your hands on Raw Milk from a dairy farm, you will be delighted with the taste and texture of this ice cream.
Ingredients:
2 cups heavy cream
4 large egg yolks
1 can (14 oz) sweetened condensed milk
1 teaspoon vanilla extract
1 tablespoon organic gelatin powder
2 tablespoons cold water
Instructions:
In a small bowl, combine the gelatin powder and cold water. Let it sit for 5 minutes to allow the gelatin to bloom.
Heat the heavy cream in a saucepan over medium heat until it starts to simmer. Remove from heat.
In a separate bowl, whisk the egg yolks until smooth and creamy.
Slowly pour the hot cream into the bowl with the egg yolks, whisking constantly to temper the yolks and prevent them from curdling.
Pour the mixture back into the saucepan and cook over low heat, stirring constantly, until the mixture thickens and coats the back of a spoon. This custard base should reach a temperature of around 170°F (77°C).
Remove the saucepan from heat and add the bloomed gelatin mixture. Stir until the gelatin is fully dissolved.
Stir in the sweetened condensed milk and vanilla extract until well combined.
Allow the mixture to cool to room temperature, then cover and refrigerate for at least 4 hours or until chilled.
Once chilled, pour the mixture into a lidded container or a loaf pan.
Cover the container tightly with plastic wrap or the lid and place it in the freezer.
Allow the ice cream to freeze for at least 6 hours or overnight until it reaches a firm consistency.
Once fully frozen, your creamy homemade ice cream is ready to be enjoyed! Serve it in bowls or cones, and feel free to add any desired toppings or mix-ins.
By incorporating egg yolks and organic gelatin, this version of the recipe will yield a creamier and more traditional ice cream texture. Enjoy your homemade creation!